
Ti mostrerò diverse operazioni che un amministratore può eseguire su un sistema Windows remoto utilizzando ansible-playbook.
Ansible è uno degli strumenti DevOps più utilizzati oggi sul mercato. Fornisce una serie di moduli Windows utilizzati per configurare e gestire il server Windows. Presumo che tu abbia già installato Ansible su Windows da dove desideri gestire i server Windows.
Di seguito sono elencate alcune delle attività comunemente utilizzate dagli amministratori di Windows su base giornaliera. Rimarrai stupito di vedere quanto sia facile amministrare Windows utilizzando Ansible.
L’indirizzo IP della mia macchina del controller Ansible Windows è 192.168.0.106 e l’indirizzo IP del mio sistema Windows remoto è 192.168.0.102. Prima di iniziare, assicurati di eseguire un modulo win_ping per verificare se sei in grado di connetterti al server remoto di Windows o meno.
[email protected] ~
$ ansible win -m win_ping
192.168.0.102 | SUCCESS => {
    "changed": false,
    "ping": "pong"
}
La mia connessione a un host remoto è riuscita.
Quindi, iniziamo con Ansible Playbooks…
Sommario:
Copia di file
win_copy è un modulo ansible che copia un file dal server locale a un host Windows remoto. Userò questo modulo per copiare un singolo PDF.
Usa il codice YAML sottostante, fornisci i percorsi di origine e di destinazione.
[email protected] ~
$ vi copy.yml
---

- hosts: win

  tasks:

  - name: Copy File

    win_copy:

      src: C:output.pdf

      dest: C:ansible_examples

      remote_src: yes
Esegui ansible-playbook per win_copy.
[email protected] ~
$ ansible-playbook copy.yml

PLAY [win] ***********************************************************************************************************************************

TASK [Gathering Facts] ***********************************************************************************************************************
ok: [192.168.0.102]

TASK [Copy File] *****************************************************************************************************************************
changed: [192.168.0.102]

PLAY RECAP ***********************************************************************************************************************************
192.168.0.102
: ok=2 changed=1 unreachable=0 failed=0
skipped=0 rescued=0 ignored=0
Il file è stato copiato correttamente nella posizione di destinazione su un sistema Windows remoto.
Installa/Rimuovi MSI
Per installare un’applicazione utilizzando il file MSI, è necessario utilizzare win_get_url per menzionare il percorso del file MSI da scaricare e quindi utilizzare il modulo win_package per installarlo. Lo stato presente significa che l’MSI sarà installato sulla macchina e l’applicazione è nello stato attuale.
Qui sto installando Apache.
Codice YAML da utilizzare:
[email protected] ~
$ vi msi.yml
---
- name: Installing Apache MSI
  hosts: win

  tasks:
    - name: Download the Apache installer
      win_get_url:
        url: https://archive.apache.org/dist/httpd/binaries/win32/httpd-2.2.25-win32-x86-no_ssl.msi
        dest: C:ansible_exampleshttpd-2.2.25-win32-x86-no_ssl.msi

    - name: Install MSI
      win_package:
        path: C:ansible_exampleshttpd-2.2.25-win32-x86-no_ssl.msi
        state: present
Esegui ansible-playbook per l’installazione tramite MSI.
[email protected] ~
$ ansible-playbook msi.yml

PLAY [Installing Apache MSI] *****************************************************************************************************************

TASK [Gathering Facts] ***********************************************************************************************************************
ok: [192.168.0.102]

TASK [Download the Apache installer] *********************************************************************************************************
changed: [192.168.0.102]

TASK [Install MSI] ***************************************************************************************************************************
changed: [192.168.0.102]

PLAY RECAP ***********************************************************************************************************************************
192.168.0.102
: ok=3 changed=2 unreachable=0 failed=0
skipped=0 rescued=0 ignored=0
Ora vai al sistema Windows e controlla se l’applicazione Apache è stata installata correttamente.
C:Userswinadmin.it>cd C:Program Files (x86)Apache Software FoundationApache2.2bin
C:Program Files (x86)Apache Software FoundationApache2.2bin>httpd -v
Server version: Apache/2.2.25 (Win32)
Server built: Jul 10 2013 01:52:12
Puoi anche installare applicazioni utilizzando MSI con argomenti. Di seguito è riportato lo stesso esempio sopra, ma invece di uno stato, stiamo usando un argomento install per installare apache.
Codice YAML da utilizzare:
---

- name: Installing Apache MSI

  hosts: win

  tasks:

    - name: Download the Apache installer

      win_get_url:

        url: https://archive.apache.org/dist/httpd/binaries/win32/httpd-2.2.25-win32-x86-no_ssl.msi

        dest: C:ansible_exampleshttpd-2.2.25-win32-x86-no_ssl.msi


    - name: Install MSI

      win_package:

        path: C:ansible_exampleshttpd-2.2.25-win32-x86-no_ssl.msi

        arguments:

          - /install

          - /passive

          - /norestart
Per disinstallare un’applicazione utilizzando il file MSI, è necessario utilizzare il modulo win_package. Lo stato assente significa che l’applicazione verrà disinstallata utilizzando il file MSI.
Qui sto disinstallando Apache.
[email protected] ~
$ vi uninstall_msi.yml

---

- name: UnInstalling Apache MSI

  hosts: win

  tasks:

    - name: UnInstall MSI

      win_package:

        path: C:ansible_exampleshttpd-2.2.25-win32-x86-no_ssl.msi

        state: absent
Esegui ansible-playbook per disinstallare utilizzando MSI.
[email protected] ~
$ ansible-playbook uninstall_msi.yml

PLAY [UnInstalling Apache MSI] *****************************************************************************************************************

TASK [Gathering Facts] ***********************************************************************************************************************
ok: [192.168.0.102]

TASK [UnInstall MSI] *************************************************************************************************************************
changed: [192.168.0.102]

PLAY RECAP ***********************************************************************************************************************************
192.168.0.102
: ok=2 changed=1 unreachable=0 failed=0
skipped=0 rescued=0 ignored=0
Ora, se controllo la versione di Apache, otterrò l’output seguente quando l’applicazione è stata disinstallata.
C:Program Files (x86)Apache Software FoundationApache2.2bin>httpd -v 'httpd' is not recognized as an internal or external command,
operable program or batch file.
Disinstalla software (.EXE)
Puoi anche disinstallare il software con il file .exe utilizzando l’ID prodotto di quel software.
[email protected] ~
$ vi uninstall.yml
---

- hosts: win

  tasks:

   - name: Uninstall 7-Zip from the exe

     win_package:

       path: C:Program Files7-ZipUninstall.exe

       product_id: 7-Zip

       arguments: /S

       state: absent
Esegui ansible-playbook per disinstallare 7-Zip.
[email protected] ~
$ ansible-playbook uninstall.yml

PLAY [win] *************************************************************************************************************************************************************************************

TASK [Gathering Facts] *************************************************************************************************************************************************************************
ok: [192.168.0.102]

TASK [Uninstall 7-Zip from the exe] ***********************************************************************************************************************************************************
changed: [192.168.0.102]

PLAY RECAP *************************************************************************************************************************************************************************************
192.168.0.102              : ok=2    changed=1    unreachable=0    failed=0    skipped=0    rescued=0    ignored=0
Arresta/Avvia/Riavvia i servizi di Windows
Il modulo win_service ansible viene utilizzato per avviare, arrestare o riavviare un servizio. Qui, ti mostrerò come interrompere il servizio Tomcat.
Devi menzionare il nome del servizio nel file YAML e impostare lo stato su stop.
[email protected] ~
$ vi service.yml
---
- hosts: win

  tasks:

   - name: Stop service Tomcat

     win_service:

       name: Tomcat8

       state: stopped
Esegui ansible-playbook per interrompere il servizio Tomcat.
[email protected] ~
$ ansible-playbook service.yml

PLAY [win] ***********************************************************************************************************************************

TASK [Gathering Facts] ***********************************************************************************************************************
ok: [192.168.0.102]

TASK [Stop service Tomcat] ****************************************************************************************************************
changed: [192.168.0.102]

PLAY RECAP ***********************************************************************************************************************************
192.168.0.102
: ok=2 changed=1 unreachable=0 failed=0
skipped=0 rescued=0 ignored=0
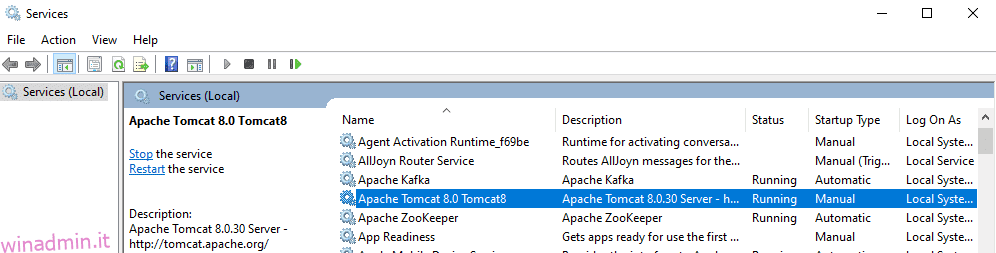
Se controlli il servizio Tomcat sul sistema Windows, ora è in stato di arresto.

È possibile definire lo stato avviato o riavviato o sospeso per modificare lo stato del servizio.
Raccolta di fatti
Utilizzando il modulo ansible win_disk_facts, puoi recuperare tutte le informazioni sul disco dell’host di destinazione.
[email protected] ~
$ vi disk.yml
---
- hosts: win
  tasks:
  - name: Get disk facts
    win_disk_facts:

  - name: Output first disk size
    debug:
      var: ansible_facts.disks[0].size

  - name: Convert first system disk into various formats
    debug:
      msg: '{{ disksize_gib }} vs {{ disksize_gib_human }}'
    vars:
      # Get first system disk
      disk: '{{ ansible_facts.disks|selectattr("system_disk")|first }}'

      # Show disk size in Gibibytes
      disksize_gib_human: '{{ disk.size|filesizeformat(true) }}'
      disksize_gib: '{{ (disk.size/1024|pow(3))|round|int }} GiB'
Esegui ansible-playbook per ottenere le informazioni sul disco.
[email protected] ~
$ ansible-playbook disk.yml

PLAY [win] ***********************************************************************************************************************************

TASK [Gathering Facts] ***********************************************************************************************************************
ok: [192.168.0.102]

TASK [Get disk facts] ************************************************************************************************************************
ok: [192.168.0.102]

TASK [Output first disk size] ****************************************************************************************************************
ok: [192.168.0.102] => {

"ansible_facts.disks[0].size": "1000204886016"
}

TASK [Convert first system disk into various formats] ****************************************************************************************
ok: [192.168.0.102] => {
"msg": "932 GiB vs 931.5 GiB"
}

PLAY RECAP ***********************************************************************************************************************************
192.168.0.102
: ok=4 changed=0 unreachable=0 failed=0
skipped=0 rescued=0 ignored=0
Utilizzando il modulo win_command ansible, puoi eseguire comandi sull’host remoto e ottenere informazioni sulla CPU, dettagli sul dispositivo e molto altro.
[email protected] ~
$ vi check.yml
---
- hosts: win
  tasks:
   - name: Get disk facts
     win_command: wmic cpu get caption, deviceid, name, numberofcores, maxclockspeed, status
     register: usage

   - debug: msg="{{ usage.stdout }}"
Esegui ansible-playbook per ottenere informazioni sul sistema remoto.
[email protected] ~
$ ansible-playbook check.yml

PLAY [win] ***********************************************************************************************************************************

TASK [Gathering Facts] ***********************************************************************************************************************
ok: [192.168.0.102]

TASK [Get facts] ************************************************************************************************************************
changed: [192.168.0.102]

TASK [debug] *********************************************************************************************************************************
ok: [192.168.0.102] => {
"msg": "Caption DeviceID MaxClockSpeed
Name
NumberOfCores Status rrnIntel64 Family 6 Model 142 Stepping 9 CPU0 2712 Intel(R) Core(TM) i5-7200U CPU @ 2.50GHz 2 OK rrnrrn"
}

PLAY RECAP ***********************************************************************************************************************************
192.168.0.102
: ok=3 changed=1 unreachable=0 failed=0
skipped=0 rescued=0
ignored=0
Comandi in esecuzione
Qualunque comando esegui su una finestra, può essere eseguito tramite il modulo ansible win_command. Devi solo specificare il comando nel tuo file YAML. Qui, sto solo creando una directory.
[email protected] ~
$ vi commands.yml
---

- hosts: win

  tasks:

   - name: run an executable using win_command

     win_command: whoami.exe


   - name: run a cmd command

      win_command: cmd.exe /c mkdir C:test
Esegui ansible-playbook per eseguire l’operazione win_command.
[email protected] ~
$ ansible-playbook commands.yml

PLAY [win] ***********************************************************************************************************************************

TASK [Gathering Facts] ***********************************************************************************************************************
ok: [192.168.0.102]

TASK [run an executable using win_command] ***************************************************************************************************
changed: [192.168.0.102]

TASK [run a cmd command] *********************************************************************************************************************
changed: [192.168.0.102]

PLAY RECAP ***********************************************************************************************************************************
192.168.0.102
: ok=3 changed=2 unreachable=0 failed=0
skipped=0 rescued=0 ignored=0
variabili ambientali
Un sistema Windows ha più variabili di ambiente, ad esempio JAVA_HOME. Utilizzando il modulo win_environment ansible, puoi aggiungere o modificare variabili di ambiente su un sistema Windows. In questo esempio, sto aggiungendo una nuova variabile all’elenco delle variabili di ambiente di Windows.
[email protected] ~
$ vi env.yml
---
- hosts: win
  tasks:
   - name: Set an environment variable for all users
     win_environment:
       state: present
       name: NewVariable
       value: New Value
       level: machine
Esegui ansible-playbook per aggiungere la variabile di ambiente su una macchina Windows remota.
[email protected] ~
$ ansible-playbook env.yml

PLAY [win] ***********************************************************************************************************************************

TASK [Gathering Facts] ***********************************************************************************************************************
ok: [192.168.0.102]

TASK [Set an environment variable for all users] *********************************************************************************************
changed: [192.168.0.102]

PLAY RECAP ***********************************************************************************************************************************
192.168.0.102
: ok=2 changed=1 unreachable=0 failed=0
skipped=0 rescued=0 ignored=0
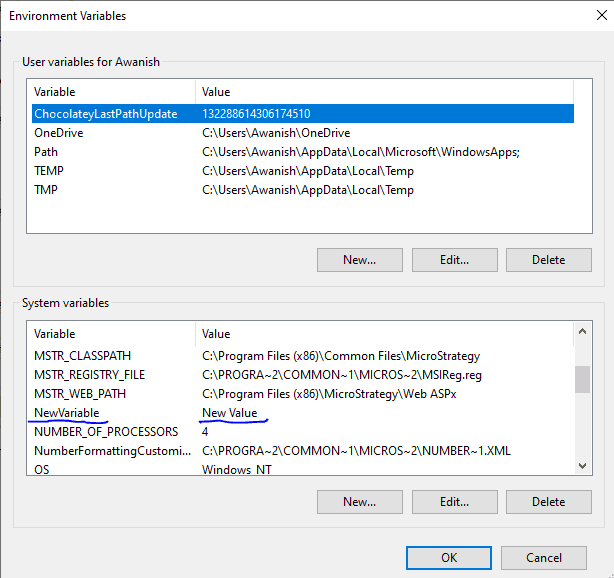
Vai alla finestra delle variabili d’ambiente; vedrai che la nuova variabile che hai appena aggiunto è presente qui.
Aggiungi/Modifica registro
Il modulo win_regedit ansible viene utilizzato per aggiungere o modificare i dettagli del registro su una macchina Windows remota. È necessario fornire il percorso del registro e il contenuto da aggiungere/aggiornare. Qui sto creando una nuova voce di registro winadmin.it all’interno di HKLM: percorso SOFTWARE e quindi aggiungendo nome e dati a questo registro.
[email protected] ~
$ vi registry.yml
---

- hosts: win

  tasks:

   - name: Creating a registry

     win_regedit:

      path: HKLM:SOFTWAREwinadmin.it

   - name: Modifying a registry, adding name and data

     win_regedit:

      path: HKLM:SOFTWAREwinadmin.it

      name: Geek

      data: Flare
Esegui ansible-playbook per aggiungere il registro.
[email protected] ~
$ ansible-playbook registry.yml

PLAY [win] ***********************************************************************************************************************************

TASK [Gathering Facts] ***********************************************************************************************************************
ok: [192.168.0.102]

TASK [Creating a registry] *******************************************************************************************************************
changed: [192.168.0.102]

TASK [Modifying a registry, adding name and data] ********************************************************************************************
changed: [192.168.0.102]

PLAY RECAP ***********************************************************************************************************************************
192.168.0.102
: ok=3 changed=2 unreachable=0 failed=0
skipped=0 rescued=0 ignored=0
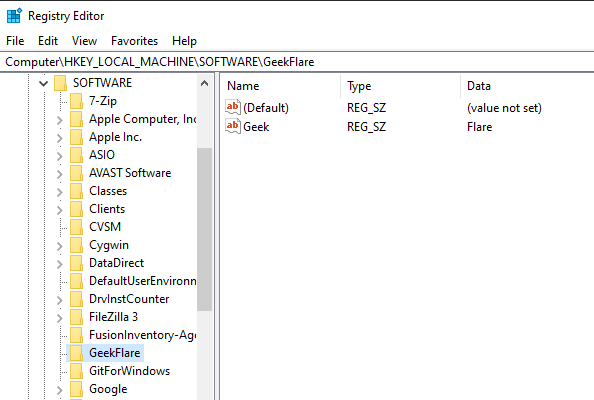
Se vai all’Editor del Registro di sistema sul sistema remoto, puoi vedere che questo registro è stato aggiunto correttamente con i parametri Nome e Dati.
Elimina registro
Il modulo win_eventlog ansible viene utilizzato per aggiungere, cancellare o rimuovere i registri eventi di Windows dal sistema Windows.
Vai su Windows Powershell ed elenca gli EventLogs presenti sul computer Windows remoto.
PS C:Userswinadmin.it> Get-EventLog -List
  Max(K) Retain OverflowAction        Entries Log
  ------ ------ --------------        ------- ---
  20,480      0 OverwriteAsNeeded      33,549 Application
  20,480      0 OverwriteAsNeeded           0 HardwareEvents
     512      7 OverwriteOlder             20 Internet Explorer
  20,480      0 OverwriteAsNeeded           0 Key Management Service
     128      0 OverwriteAsNeeded         190 OAlerts
                                              Security
  20,480      0 OverwriteAsNeeded      44,828 System
  15,360      0 OverwriteAsNeeded       3,662 Windows PowerShell
Ora mostrerò come rimuovere i registri da tutte le fonti per Internet Explorer.
[email protected] ~
$ vi log.yml
---
- hosts: win
  tasks:
   - name: Remove Internet Explorer Logs
     win_eventlog:
      name: Internet Explorer
      state: absent
Esegui ansible-playbook per rimuovere Internet Explorer dal computer Windows remoto.
[email protected] ~
$ ansible-playbook log.yml

PLAY [win] *************************************************************************************************************************************************************************************

TASK [Gathering Facts] *************************************************************************************************************************************************************************
ok: [192.168.0.102]

TASK [Remove Internet Explorer Logs] **********************************************************************************************************************************************
changed: [192.168.0.102]

PLAY RECAP *************************************************************************************************************************************************************************************
192.168.0.102              : ok=2    changed=1    unreachable=0    failed=0    skipped=0    rescued=0    ignored=0
Ora, se elenchi di nuovo gli EventLog, vedrai che i registri di Internet Explorer sono stati rimossi.
PS C:Userswinadmin.it> Get-EventLog -List

  Max(K) Retain OverflowAction        Entries Log
  ------ ------ --------------        ------- ---
  20,480      0 OverwriteAsNeeded      33,549 Application
  20,480      0 OverwriteAsNeeded           0 HardwareEvents
  20,480      0 OverwriteAsNeeded           0 Key Management Service
     128      0 OverwriteAsNeeded         190 OAlerts
                                              Security
  20,480      0 OverwriteAsNeeded      44,835 System
  15,360      0 OverwriteAsNeeded          56 Windows PowerShell
Quindi, tutto riguardava i playbook Ansible, che possono essere utilizzati per l’amministrazione remota di Windows. Vai avanti e prova questi playbook. Puoi anche provarne altri Moduli Windows Ansible a disposizione.