
Ti chiedi, cos’è Terraform? Scopriamolo.
Infrastructure as Code (IaC) è una terminologia diffusa tra i professionisti DevOps. È il processo di gestione e fornitura dell’intera infrastruttura IT (comprendente macchine fisiche e virtuali) utilizzando file di definizione leggibili dalla macchina. È un approccio di ingegneria del software alle operazioni. Aiuta ad automatizzare l’intero data center utilizzando gli script di programmazione.
Con tutte le funzionalità fornite da Infrastructure as Code, presenta molteplici sfide:
- Necessità di imparare a programmare
- Non conosco l’impatto del cambiamento.
- Necessità di annullare la modifica
- Impossibile tenere traccia delle modifiche
- Impossibile automatizzare una risorsa
- Più ambienti per l’infrastruttura
Terraform è stato creato per risolvere queste sfide.
Cos’è Terraform?
Terraforma è un’infrastruttura open source come strumento di codice sviluppato da HashiCorp. Viene utilizzato per definire e fornire l’intera infrastruttura utilizzando un linguaggio dichiarativo di facile apprendimento.
È uno strumento di provisioning dell’infrastruttura in cui è possibile archiviare la configurazione dell’infrastruttura cloud come codici. È molto simile a strumenti come CloudFormation, che useresti per automatizzare la tua infrastruttura AWS, ma puoi usarla solo su AWS. Con Terraform puoi usarlo anche su altre piattaforme cloud.
Di seguito sono riportati alcuni dei vantaggi dell’utilizzo di Terraform.
- Fa l’orchestrazione, non solo la gestione della configurazione
- Supporta più provider come AWS, Azure, GCP, DigitalOcean e molti altri
- Fornisci un’infrastruttura immutabile in cui la configurazione cambia senza intoppi
- Utilizza un linguaggio di facile comprensione, HCL (linguaggio di configurazione HashiCorp)
- Facilmente trasportabile a qualsiasi altro provider
- Supporta l’architettura solo client, quindi non è necessaria una gestione della configurazione aggiuntiva su un server
Sommario:
Concetti di base di Terraform
Di seguito sono riportati i concetti/le terminologie principali utilizzati in Terraform:
- Variabili: utilizzate anche come variabili di input, è una coppia chiave-valore utilizzata dai moduli Terraform per consentire la personalizzazione.
- Provider: è un plugin per interagire con le API di servizio e accedere alle relative risorse.
- Modulo: è una cartella con i modelli Terraform in cui sono definite tutte le configurazioni
- Stato: è costituito da informazioni memorizzate nella cache sull’infrastruttura gestita da Terraform e le relative configurazioni.
- Risorse: si riferisce a un blocco di uno o più oggetti dell’infrastruttura (istanze di calcolo, reti virtuali, ecc.), che vengono utilizzati nella configurazione e nella gestione dell’infrastruttura.
- Fonte dati: è implementato dai fornitori per restituire informazioni su oggetti esterni da terraformare.
- Valori di output: questi sono i valori di ritorno di un modulo terraform che può essere utilizzato da altre configurazioni.
- Piano: è una delle fasi in cui determina cosa deve essere creato, aggiornato o distrutto per passare dallo stato reale/attuale dell’infrastruttura allo stato desiderato.
- Applica: è una delle fasi in cui applica le modifiche allo stato reale/attuale dell’infrastruttura per passare allo stato desiderato.
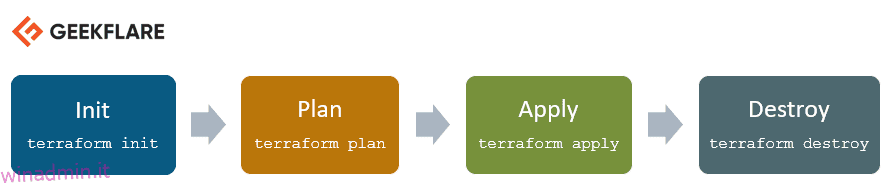
Ciclo di vita della terraforma
Il ciclo di vita di Terraform consiste in: inizia, pianifica, applica e distruggi.
- Terraform init inizializza la directory di lavoro che consiste di tutti i file di configurazione
- Il piano Terraform viene utilizzato per creare un piano di esecuzione per raggiungere lo stato desiderato dell’infrastruttura. Le modifiche ai file di configurazione vengono eseguite per ottenere lo stato desiderato.
- Terraform applica quindi apporta le modifiche all’infrastruttura come definito nel piano e l’infrastruttura raggiunge lo stato desiderato.
- La distruzione di Terraform viene utilizzata per eliminare tutte le vecchie risorse dell’infrastruttura, che sono contrassegnate come contaminate dopo la fase di applicazione.
Come funziona Terraform?
Terraform ha due componenti principali che compongono la sua architettura:
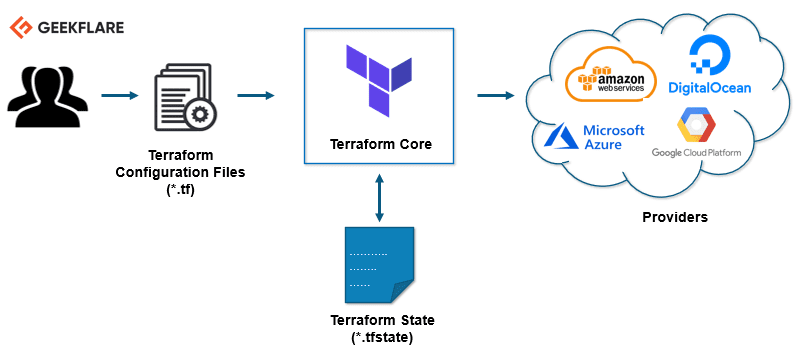
Nucleo Terraforma
Il core di Terraform utilizza due sorgenti di input per fare il suo lavoro.
La prima sorgente di input è una configurazione Terraform che l’utente configura. Qui definisci cosa deve essere creato o sottoposto a provisioning. E la seconda fonte di input è uno stato in cui terraform mantiene lo stato aggiornato di come appare l’attuale configurazione dell’infrastruttura.
Quindi, ciò che fa il nucleo di terraforma è prendere l’input e capire il piano di ciò che deve essere fatto. Confronta lo stato, qual è lo stato corrente e qual è la configurazione che desideri nel risultato finale. Capisce cosa è necessario fare per raggiungere lo stato desiderato nel file di configurazione. Calcola ciò che deve essere creato, ciò che deve essere aggiornato, ciò che deve essere eliminato per creare e fornire l’infrastruttura.
Fornitori
Il secondo componente dell’architettura sono i fornitori di tecnologie specifiche. Potrebbe trattarsi di provider cloud come AWS, Azure, GCP o altre infrastrutture come piattaforma di servizi. È anche un fornitore per componenti più di alto livello come Kubernetes o altri strumenti di piattaforma come servizio, anche alcuni software come strumento self-service.
Ti dà la possibilità di creare infrastrutture su diversi livelli.
Ad esempio, crea un’infrastruttura AWS, quindi distribuisci Kubernetes su di essa e quindi crea servizi/componenti all’interno del cluster Kubernetes.
Terraform ha oltre un centinaio di provider per diverse tecnologie e ogni provider fornisce quindi all’utente terraform l’accesso alle proprie risorse. Quindi, tramite il provider AWS, ad esempio, hai accesso a centinaia di risorse AWS come le istanze EC2, gli utenti AWS, ecc. Con il provider Kubernetes, accedi a materie prime, risorse come servizi, distribuzioni e spazi dei nomi, ecc.
Quindi, è così che funziona Terraform e, in questo modo, cerca di aiutarti a fornire e coprire l’intera configurazione dell’applicazione dall’infrastruttura fino all’applicazione.
Facciamo alcune cose pratiche. 👨💻
Installeremo Terraform su Ubuntu e forniremo un’infrastruttura molto semplice.
Installa Terraform
Scarica l’ultimo pacchetto Terraform.
Fare riferimento al pagina di download ufficiale per ottenere l’ultima versione per il rispettivo sistema operativo.
[email protected]:~$ wget https://releases.hashicorp.com/terraform/0.13.0/terraform_0.13.0_linux_amd64.zip
--2020-08-14 16:55:38--
https://releases.hashicorp.com/terraform/0.13.0/terraform_0.13.0_linux_amd64.zip
Resolving releases.hashicorp.com (releases.hashicorp.com)... 151.101.153.183, 2a04:4e42:24::439
Connecting to releases.hashicorp.com (releases.hashicorp.com)|151.101.153.183|:443... connected.
HTTP request sent, awaiting response... 200 OK
Length: 34851622 (33M) [application/zip]
Saving to: ‘terraform_0.13.0_linux_amd64.zip’

terraform_0.13.0_linux_amd64.zip
100%[=================================================================>] 33.24M
90.3KB/s in 5m 28s

2020-08-14 17:01:06 (104 KB/s) - ‘terraform_0.13.0_linux_amd64.zip’ saved [34851622/34851622]
Estrarre il pacchetto scaricato.
[email protected]:~$ unzip terraform_0.13.0_linux_amd64.zip
Archive:
terraform_0.13.0_linux_amd64.zip
inflating: terraform
Sposta il file eseguibile terraform nel percorso mostrato di seguito. Controlla la versione terraform.
[email protected]:~$ sudo mv terraform /usr/local/bin/
[sudo] password for winadmin.it:
[email protected]:~$ terraform -v
Terraform v0.13.0
Puoi vedere che questi sono i comandi disponibili in terraform per l’esecuzione.
[email protected]:~$ terraform
Usage: terraform [-version] [-help] <command> [args]

The available commands for execution are listed below.
The most common, useful commands are shown first, followed by
less common or more advanced commands. If you're just getting
started with Terraform, stick with the common commands. For the
other commands, please read the help and docs before usage.

Common commands:
apply Builds or changes infrastructure
console Interactive console for Terraform interpolations
destroy Destroy Terraform-managed infrastructure
env Workspace management
fmt Rewrites config files to canonical format
get Download and install modules for the configuration
graph Create a visual graph of Terraform resources
import Import existing infrastructure into Terraform
init Initialize a Terraform working directory
login Obtain and save credentials for a remote host
logout Remove locally-stored credentials for a remote host
output Read an output from a state file
plan Generate and show an execution plan
providers Prints a tree of the providers used in the configuration
refresh Update local state file against real resources
show Inspect Terraform state or plan
taint Manually mark a resource for recreation
untaint Manually unmark a resource as tainted
validate Validates the Terraform files
version Prints the Terraform version
workspace Workspace management

All other commands:
0.12upgrade Rewrites pre-0.12 module source code for v0.12
0.13upgrade Rewrites pre-0.13 module source code for v0.13
debug Debug output management (experimental)
force-unlock Manually unlock the terraform state
push Obsolete command for Terraform Enterprise legacy (v1)
state Advanced state management
Fornitura di un’istanza AWS EC2 utilizzando Terraform
In questa demo, lancerò una nuova istanza AWS EC2 utilizzando Terraform.
Crea una directory di lavoro per questa demo di Terraform.
[email protected]:~$ mkdir terraform_demo
Vai alla directory e crea un file di configurazione terraform in cui definisci il provider e le risorse per avviare un’istanza AWS EC2.
[email protected]:~$ cd terraform_demo/
[email protected]:~/terraform_demo$ gedit awsec2.tf

provider "aws" {
access_key = "B5KG6Fe5GUKIATUF5UD"
secret_key = "R4gb65y56GBF6765ejYSJA4YtaZ+T6GY7H"
region = "us-west-2"
}

resource "aws_instance" "terraform_demo" {
ami = "ami-0a634ae95e11c6f91"
instance_type = "t2.micro"
}
Nota: ho cambiato le chiavi di accesso e segrete 😛, devi usare le tue.
Dalla configurazione sopra menzionata, puoi vedere che sto menzionando il provider come AWS. All’interno del provider, fornisco le credenziali utente AWS e le regioni in cui l’istanza deve essere avviata.
Nelle risorse, sto fornendo i dettagli AMI di Ubuntu (ami-0a634ae95e11c6f91) e menzionando il tipo di istanza dovrebbe essere t2.micro
Puoi vedere quanto sia facile e leggibile il file di configurazione, anche se non sei un programmatore irriducibile.
terraforma init
Ora, il primo passo è inizializzare terraform.
[email protected]:~/terraform_demo$ terraform init

Initializing the backend...

Initializing provider plugins...
- Using previously-installed hashicorp/aws v3.2.0

The following providers do not have any version constraints in configuration,
so the latest version was installed.

To prevent automatic upgrades to new major versions that may contain breaking
changes, we recommend adding version constraints in a required_providers block
in your configuration, with the constraint strings suggested below.

* hashicorp/aws: version = "~> 3.2.0"

Terraform has been successfully initialized!

You may now begin working with Terraform. Try running "terraform plan" to see
any changes that are required for your infrastructure. All Terraform commands
should now work.

If you ever set or change modules or backend configuration for Terraform,
rerun this command to reinitialize your working directory. If you forget, other
commands will detect it and remind you to do so if necessary.
piano terraforma
La prossima è la fase del piano; creerà il grafico di esecuzione per la creazione e il provisioning dell’infrastruttura.
[email protected]:~/terraform_demo$ terraform plan
Refreshing Terraform state in-memory prior to plan...
The refreshed state will be used to calculate this plan, but will not be
persisted to local or remote state storage.

------------------------------------------------------------------------

An execution plan has been generated and is shown below.
Resource actions are indicated with the following symbols:
+ create

Terraform will perform the following actions:

# aws_instance.terraform_demo will be created
+ resource "aws_instance" "terraform_demo" {
+ ami = "ami-0a634ae95e11c6f91"
+ arn = (known after apply)
+ associate_public_ip_address = (known after apply)
+ availability_zone = (known after apply)
+ cpu_core_count = (known after apply)
+ cpu_threads_per_core = (known after apply)
+ get_password_data = false
+ host_id = (known after apply)
+ id = (known after apply)
+ instance_state = (known after apply)
+ instance_type = "t2.micro"
+ ipv6_address_count = (known after apply)
+ ipv6_addresses = (known after apply)
+ key_name = (known after apply)
+ outpost_arn = (known after apply)
+ password_data = (known after apply)
+ placement_group = (known after apply)
+ primary_network_interface_id = (known after apply)
+ private_dns = (known after apply)
+ private_ip = (known after apply)
+ public_dns = (known after apply)
+ public_ip = (known after apply)
+ secondary_private_ips = (known after apply)
+ security_groups = (known after apply)
+ source_dest_check = true
+ subnet_id = (known after apply)
+ tenancy = (known after apply)
+ volume_tags = (known after apply)
+ vpc_security_group_ids = (known after apply)

+ ebs_block_device {
+ delete_on_termination = (known after apply)
+ device_name = (known after apply)
+ encrypted = (known after apply)
+ iops = (known after apply)
+ kms_key_id = (known after apply)
+ snapshot_id = (known after apply)
+ volume_id = (known after apply)
+ volume_size = (known after apply)
+ volume_type = (known after apply)
}

+ ephemeral_block_device {
+ device_name = (known after apply)
+ no_device = (known after apply)
+ virtual_name = (known after apply)
}

+ metadata_options {
+ http_endpoint = (known after apply)
+ http_put_response_hop_limit = (known after apply)
+ http_tokens = (known after apply)
}

+ network_interface {
+ delete_on_termination = (known after apply)
+ device_index = (known after apply)
+ network_interface_id = (known after apply)
}

+ root_block_device {
+ delete_on_termination = (known after apply)
+ device_name = (known after apply)
+ encrypted = (known after apply)
+ iops = (known after apply)
+ kms_key_id = (known after apply)
+ volume_id = (known after apply)
+ volume_size = (known after apply)
+ volume_type = (known after apply)
}
}

Plan: 1 to add, 0 to change, 0 to destroy.

------------------------------------------------------------------------

Note: You didn't specify an "-out" parameter to save this plan, so Terraform
can't guarantee that exactly these actions will be performed if
"terraform apply" is subsequently run.
applicare terraform
La fase di applicazione eseguirà il file di configurazione e avvierà un’istanza AWS EC2. Quando esegui applica il comando, ti chiederà “Vuoi eseguire queste azioni?”, Devi digitare yes e premere invio.
[email protected]:~/terraform_demo$ terraform apply

An execution plan has been generated and is shown below.
Resource actions are indicated with the following symbols:
+ create

Terraform will perform the following actions:

# aws_instance.terraform_demo will be created
+ resource "aws_instance" "terraform_demo" {
+ ami = "ami-0a634ae95e11c6f91"
+ arn = (known after apply)
+ associate_public_ip_address = (known after apply)
+ availability_zone = (known after apply)
+ cpu_core_count = (known after apply)
+ cpu_threads_per_core = (known after apply)
+ get_password_data = false
+ host_id = (known after apply)
+ id = (known after apply)
+ instance_state = (known after apply)
+ instance_type = "t2.micro"
+ ipv6_address_count = (known after apply)
+ ipv6_addresses = (known after apply)
+ key_name = (known after apply)
+ outpost_arn = (known after apply)
+ password_data = (known after apply)
+ placement_group = (known after apply)
+ primary_network_interface_id = (known after apply)
+ private_dns = (known after apply)
+ private_ip = (known after apply)
+ public_dns = (known after apply)
+ public_ip = (known after apply)
+ secondary_private_ips = (known after apply)
+ security_groups = (known after apply)
+ source_dest_check = true
+ subnet_id = (known after apply)
+ tenancy = (known after apply)
+ volume_tags = (known after apply)
+ vpc_security_group_ids = (known after apply)

+ ebs_block_device {
+ delete_on_termination = (known after apply)
+ device_name = (known after apply)
+ encrypted = (known after apply)
+ iops = (known after apply)
+ kms_key_id = (known after apply)
+ snapshot_id = (known after apply)
+ volume_id = (known after apply)
+ volume_size = (known after apply)
+ volume_type = (known after apply)
}

+ ephemeral_block_device {
+ device_name = (known after apply)
+ no_device = (known after apply)
+ virtual_name = (known after apply)
}

+ metadata_options {
+ http_endpoint = (known after apply)
+ http_put_response_hop_limit = (known after apply)
+ http_tokens = (known after apply)
}

+ network_interface {
+ delete_on_termination = (known after apply)
+ device_index = (known after apply)
+ network_interface_id = (known after apply)
}

+ root_block_device {
+ delete_on_termination = (known after apply)
+ device_name = (known after apply)
+ encrypted = (known after apply)
+ iops = (known after apply)
+ kms_key_id = (known after apply)
+ volume_id = (known after apply)
+ volume_size = (known after apply)
+ volume_type = (known after apply)
}
}

Plan: 1 to add, 0 to change, 0 to destroy.

Do you want to perform these actions?
Terraform will perform the actions described above.
Only 'yes' will be accepted to approve.

Enter a value: yes

aws_instance.terraform_demo: Creating...
aws_instance.terraform_demo: Still creating... [10s elapsed]
aws_instance.terraform_demo: Still creating... [20s elapsed]
aws_instance.terraform_demo: Still creating... [30s elapsed]
aws_instance.terraform_demo: Still creating... [40s elapsed]
aws_instance.terraform_demo: Creation complete after 44s [id=i-0eec33286ea4b0740]

Apply complete! Resources: 1 added, 0 changed, 0 destroyed.
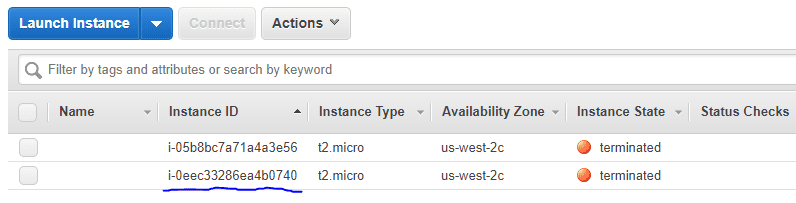
Vai alla dashboard di AWS EC2 e vedrai che è stata creata una nuova istanza con l’ID istanza menzionato alla fine del comando apply.
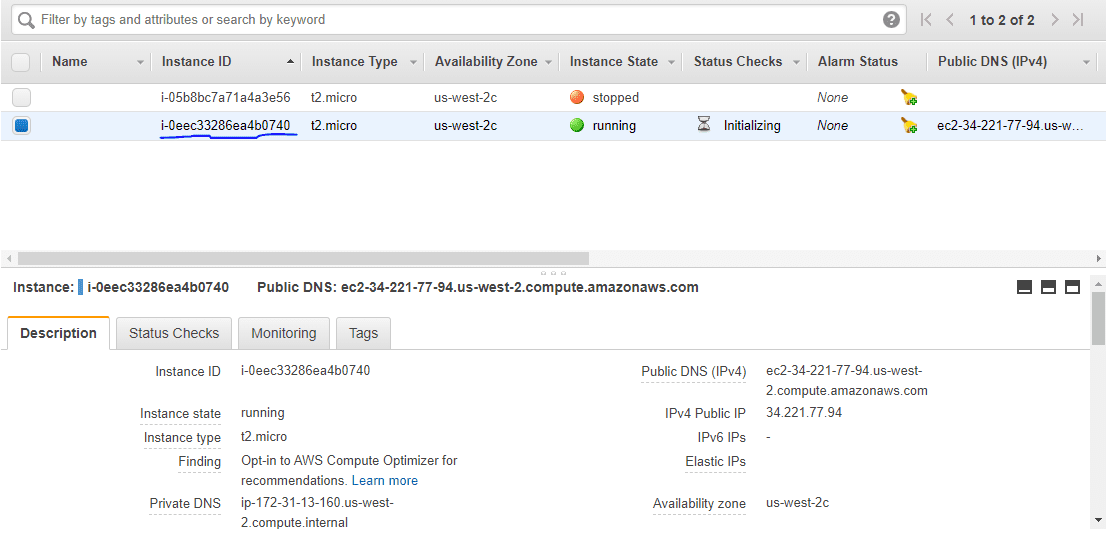
Hai avviato correttamente un’istanza AWS EC2 utilizzando Terraform.
terraforma distruggi
Infine, se vuoi eliminare l’infrastruttura, devi eseguire il comando destroy.
[email protected]:~/terraform_demo$ terraform destroy
aws_instance.terraform_demo: Refreshing state... [id=i-0eec33286ea4b0740]

An execution plan has been generated and is shown below.
Resource actions are indicated with the following symbols:
- destroy

Terraform will perform the following actions:

# aws_instance.terraform_demo will be destroyed
- resource "aws_instance" "terraform_demo" {
- ami = "ami-0a634ae95e11c6f91" -> null
- arn = "arn:aws:ec2:us-west-2:259212389929:instance/i-0eec33286ea4b0740" -> null
- associate_public_ip_address = true -> null
- availability_zone = "us-west-2c" -> null
- cpu_core_count = 1 -> null
- cpu_threads_per_core = 1 -> null
- disable_api_termination = false -> null
- ebs_optimized = false -> null
- get_password_data = false -> null
- hibernation = false -> null
- id = "i-0eec33286ea4b0740" -> null
- instance_state = "running" -> null
- instance_type = "t2.micro" -> null
- ipv6_address_count = 0 -> null
- ipv6_addresses = [] -> null
- monitoring = false -> null
- primary_network_interface_id = "eni-02a46f2802fd15634" -> null
- private_dns = "ip-172-31-13-160.us-west-2.compute.internal" -> null
- private_ip = "172.31.13.160" -> null
- public_dns = "ec2-34-221-77-94.us-west-2.compute.amazonaws.com" -> null
- public_ip = "34.221.77.94" -> null
- secondary_private_ips = [] -> null
- security_groups = [
- "default",
] -> null
- source_dest_check = true -> null
- subnet_id = "subnet-5551200c" -> null
- tags = {} -> null
- tenancy = "default" -> null
- volume_tags = {} -> null
- vpc_security_group_ids = [
- "sg-b5b480d1",
] -> null

- credit_specification {
- cpu_credits = "standard" -> null
}

- metadata_options {
- http_endpoint = "enabled" -> null
- http_put_response_hop_limit = 1 -> null
- http_tokens = "optional" -> null
}

- root_block_device {
- delete_on_termination = true -> null
- device_name = "/dev/sda1" -> null
- encrypted = false -> null
- iops = 100 -> null
- volume_id = "vol-0be2673afff6b1a86" -> null
- volume_size = 8 -> null
- volume_type = "gp2" -> null
}
}

Plan: 0 to add, 0 to change, 1 to destroy.

Do you really want to destroy all resources?
Terraform will destroy all your managed infrastructure, as shown above.
There is no undo. Only 'yes' will be accepted to confirm.

Enter a value: yes

aws_instance.terraform_demo: Destroying... [id=i-0eec33286ea4b0740]
aws_instance.terraform_demo: Still destroying... [id=i-0eec33286ea4b0740, 10s elapsed]
aws_instance.terraform_demo: Still destroying... [id=i-0eec33286ea4b0740, 20s elapsed]
aws_instance.terraform_demo: Still destroying... [id=i-0eec33286ea4b0740, 30s elapsed]
aws_instance.terraform_demo: Destruction complete after 34s

Destroy complete! Resources: 1 destroyed.
Se ricontrolli la dashboard di EC2, vedrai che l’istanza è stata terminata.
Conclusione
Credo che quanto sopra ti dia un’idea per iniziare con Terraform. Vai avanti e prova l’esempio che ho appena mostrato.
Dovresti anche dare un’occhiata a questi software di automazione dell’infrastruttura.
Se sei interessato a saperne di più, ti suggerisco di controllare Imparare DevOps con il corso Terraform.